//Publication Date: 09/20/2022_
Buying a mainframe - Shipping and Installation
This entry picks up where the previous article left off, covering the physical side of purchasing a mainframe. This article covers shipping, installation, and electrical work.
Preparing for installation
Before you can book shipping, you need to make sure that you can actually accept and fit a mainframe. Even if you are determined to get a machine, it is crucial to go through this step ahead of time, as you will know where you will have problems. It is always better to fix these issues before the 1800lbs+ mainframe arrives at your house on a truck. In order, you should verify the following:
Doorframe clearance
A mainframe should fit through most doors, but this does not mean that the door in your house will be up to code. A difference as small as a half inch can ruin your day. To find the exact dimensions for your machine, you will need two documents. First, consult the sales manual page for the machine you are looking at. For example, here is the page for the z114 model. Yours will look similar. Secondly, consult the installation manual for physical planning or IMPP. This document will go into much more detail on the exact physical specs of the machine, but the sales manual page will have enough of an overview for most work. Once you have found the dimensions, measure the exact height of the doorframes. Use a tape measure, and ensure that it is straight and that you measure to the lowest part of the door frame. It can be very easy to allow your optimism to adust your measurement, but not knowing only means you will have less time to fix it. Instead of being able to fix it ahead of time, you will have to do it the day of, which is not fun. Take it from experience. Once you have ensured that the door frame is high enough, you must also check your turning radiuses. If any of the doors along the path the machine is going to travel have tight corners, get the tape measure and make sure it can fit.
Stairs
The mainframe will never make it up a flight of stairs assembled. The machine is too big, and the casters are too heavy. So if you need to get a mainframe over a ledge or into a basement, you must disassemble it. This process takes serval hours at a minimum, and the casing will still weigh nearly 500 lbs. Keep this in mind when you are deciding where you are going to store your mainframe.
Power
We will go into more detail on this later in this piece, but ensure that the location where the mainframe is to be installed has at least one 220v 20A circuit. It is even better if you can get three-phase, but it is rare (at least in the states).
Finding and booking shipping
Shipping can be one of your biggest headaches, depending on your location in relation to the machine. I recommend picking the machine up yourself in a Uhaul, Penske, or similar rental truck. The commercial freight shipping infrastructure is not set up to accommodate shipping large, heavy, sensitive equipment like a mainframe. Finding shippers willing to move the machine at all is extremely difficult, and finding one willing to move it at a reasonable price is almost impossible. If you cannot transport the machine yourself (like me), you have two options. First, you can pay a specialty freight shipping service like craters and freighters to box up your machine in a specialty roll-in crate and then ship it. This is very expensive, but the quality of service is very high, and your machine will be in the hands of experts who specialize in this type of work. I recommend it if you have the budget (2-4k depending on distance). If you don’t (like me), you are stuck with the second option. Peer-to-peer shipping services like Uship and freightstar essentially work as uber-like brokers, matching shippers to customers. The problem is that quality control is hit or miss. In my case, I was hit with a very unexpected extra charge and had to give a down payment twice (once to freightstar, and once to the shipping company). There is also no guarantee that the company that you book with will not subcontract you out to a third party. This should keep you from going this route, keep in mind that there may be surprises, and you should definitely book extra insurance. If your seller is kind enough to offer to crate or pelletize your machine, take this option. To book freight shipping for pelletized items, use a service called freight quote. They can match you to a shipper for a fraction of the cost of booking directly. I used them, and I had no problems.
Installation and power
When the machine finally does arrive, you will have to set up power for the unit. First, check to see what type of connector your machine comes with by default, and then decide how you will wire it up. Check the IMPP for the exact circuit amperage that you will need for this installation. Generally, you will need a 20A breaker for a single-frame unit and 3 phase for a multi-frame unit. Check the exact wattage on the power chart, as it will give you a more accurate description. If you already have a machine wired for 220v, you are good to go and can directly connect your device to your power outlet. If your machine is wired for three-phase, and you have a three-phase supply, you can do likewise. If you have a three-phase machine and need to wire it to accept 220v, this is not a significant problem. The 3 phase can be easily adapted to 220v using the following wiring configuration. Before describing the correct wiring configuration, I will briefly explain why this adaptation works. Please ensure that the starting configurations described below match those in your situation. When messing with high voltage, you can never be too careful.
220v adaptation explanation
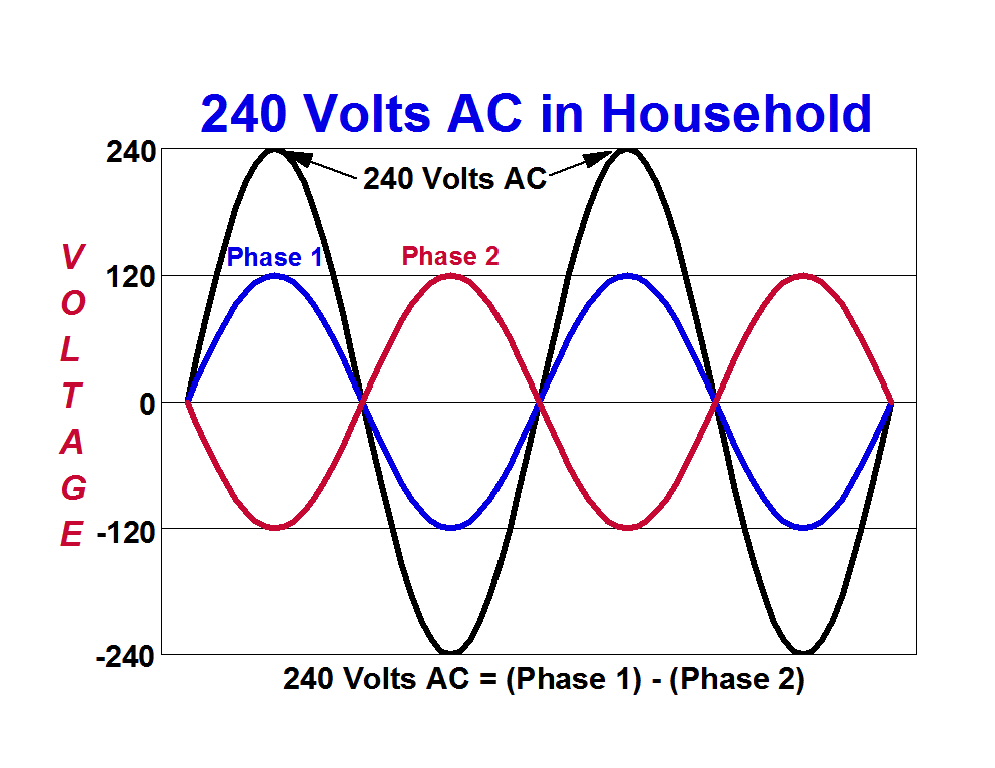
The US power system does not have a pure 220v line in the same way a 110v circuit does. With a 110v circuit, there is a hot wire which supplies power and a neutral wire which is only live when the circuit is. In the case of a 220v line, you have two separate 110v lines which are out of phase. In this context, “out of context” refers to the waveform property of AC power. AC power alternates between a positive voltage (power flowing through the hot wire into the device and back out into the ground wire) and a negative voltage (power flowing from the neutral wire back into the hot wire). In a 220v system, these waves are spaced out 180 degrees, so there is always a 220v differential between the two waves. In this layout, both wires are “hot” wires, and there is no neutral.
You can use this hack if this matches your wiring (check with a circuit tester). If not, YMMV (consult an electrician). To rewire your machine, wire the phase 1 cable on the mainframe to the first hot wire on your 220v circuit, the phase 2 wire to the second hot wire on the 220v, and the ground wire to the ground wire. Leave the phase 3 wire disconnected. When you first power the machine on, keep in mind that nothing can happen for up to two minutes. This is not a bad thing, just a natural part of the power on process. Set a timer on your phone to keep yourself from freaking out (it always seems longer when you do it yourself). Also, don’t worry if you can only connect one of your power leads. On a single-frame model, this is not a problem.
With the machine installed and powered on for the first time, the next and final installment of this series will cover how and what peripherals you will need to source.